Table of content
Choosing a Text Editor for VTT Files
When it comes to editing VTT files, selecting the right text editor can significantly impact your workflow and overall experience. Several text editors in the market cater to various needs, but some of the most recommended ones for VTT file editing are Notepad++, Sublime Text, and Visual Studio Code.
Recommended Text Editors
- Notepad++: This popular text editor is favored for its user-friendly interface and extensive plugin support. Notepad++ provides syntax highlighting for VTT files, making it easier to spot errors and format cues accurately. Its lightweight nature ensures smooth performance even with large VTT files.
- Sublime Text: Known for its speed and versatility, Sublime Text is another top choice for VTT file editing. With a minimalist design, it offers a distraction-free environment, allowing you to focus solely on editing your VTT files. Additionally, its multiple selections feature comes in handy when making changes to multiple cues simultaneously.
- Visual Studio Code: This feature-rich text editor, developed by Microsoft, is a powerful tool for VTT file editing. With its built-in terminal and debugging support, Visual Studio Code offers more than just text editing capabilities. It also boasts a vast library of extensions that can enhance your VTT file editing experience.
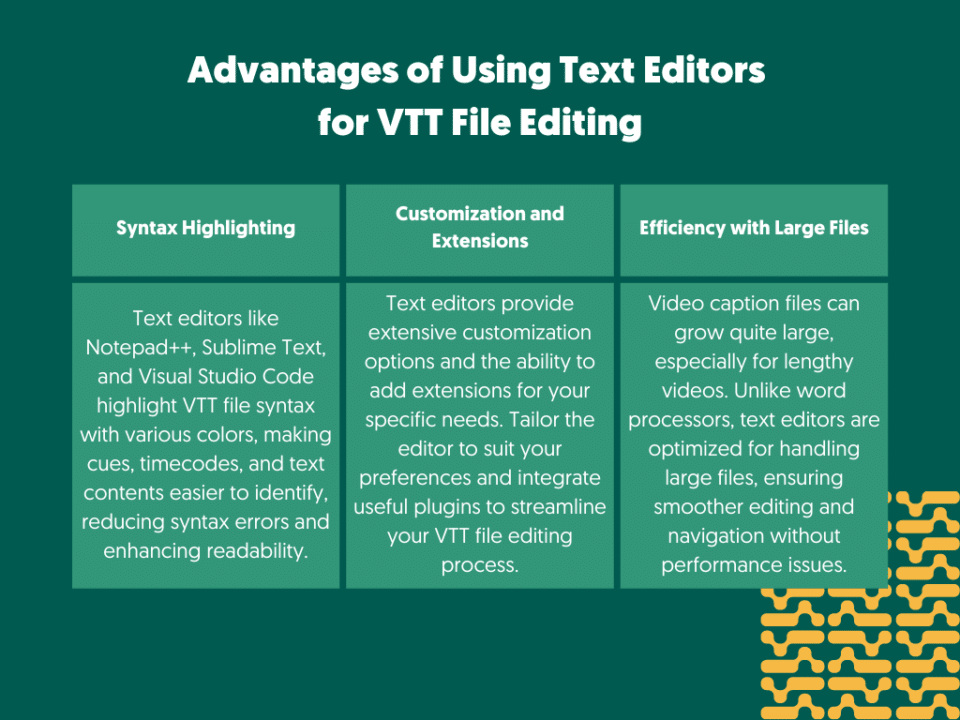
Advantages of Using Text Editors for VTT File Editing
Using a dedicated text editor for VTT file editing presents several advantages over standard word processing software. Unlike word processors, text editors are designed to handle plain text efficiently and are better suited for the specific syntax used in VTT files. Some key advantages include:
Installing and Setting Up the Chosen Text Editor
After choosing the text editor that suits your preferences and needs, the next step is to install and set it up on your computer. Installation is usually straightforward and involves downloading the appropriate installer from the text editor’s official website and running it on your system.
Once installed, you can customize the editor’s settings to enhance your VTT file editing experience. Adjust font sizes, enable word wrapping, and configure color themes to make the editing environment comfortable for you.
With your text editor installed and configured, you’re now equipped with a powerful tool to dive into VTT file editing. The next sections of this guide will cover the process of adding chapter markers and enhancing your video navigation.

Find out more about finding the right tools for VTT files
Find out moreIdentifying Chapter Points
Importance of Selecting Appropriate Chapter Points
Selecting the right chapter points is crucial for creating a meaningful and user-friendly video navigation experience. Chapter points serve as signposts that guide viewers to essential sections of the video. When choosing these points, consider the relevance and significance of the content. Identify moments that highlight key events, important information, or topic changes. By doing so, you can help viewers quickly find the specific content they are looking for, saving them time and enhancing their overall engagement with your video.
Determining Key Events or Topic Changes
To identify chapter points effectively, focus on the key events and transitions within your video. These events could be critical moments, demonstrations, or discussions that hold particular importance in the overall context of the content. Similarly, topic changes mark shifts from one subject matter to another. By understanding the flow and structure of your video, you can determine where to place chapter markers to aid viewers in navigating through different sections smoothly.
Timecode Selection for Chapter Markers
Accurate timecode selection is essential for placing chapter markers precisely at the intended points in your video. Most video players interpret timecodes in the HH:MM:SS.MMM (hours, minutes, seconds, milliseconds) format. While adding chapter markers, ensure that the timecodes align with the start of each chapter. To improve user experience, consider selecting timecodes at natural breaks or pauses in the video, making it easier for viewers to jump to specific sections without missing any crucial content.
By identifying appropriate chapter points, you can create a well-structured video with clear navigational cues. This approach not only enhances viewer satisfaction but also encourages them to explore more of your content, leading to increased engagement and retention. In the next section, we will delve into the process of formatting chapter markers in your VTT file, unlocking the full potential of your video’s navigation capabilities.
Formatting Chapter Markers
Introduction to Chapter Cue Settings Syntax
To effectively add chapter markers to a VTT file, it’s essential to understand the syntax used for defining chapter cues. Chapter cues are created using specific settings within the VTT file, denoting the start and end times of each chapter, along with additional optional information like chapter titles. The syntax generally follows the format of:

The ‘CHAPTER‘ keyword indicates the beginning of a new chapter cue, followed by the start and end times in HH:MM:SS.MMM format, and the chapter title, which is displayed when the viewer interacts with the chapter markers.
Step-by-Step Guide for Creating Chapter Markers
- Start time and end time format: Begin by determining the start and end times of each chapter in your video. You can easily identify these timestamps by scrubbing through the video or using video editing software. Ensure to format the timecodes correctly in HH:MM:SS.MMM format.
- Chapter title and additional settings: After setting the timecodes, assign a descriptive title to each chapter. The title should be concise yet informative, giving viewers a clear idea of the content they can expect. Optionally, you can include additional settings such as cue styling (e.g., italics, bold) or even custom CSS classes for further customization.
Examples of Properly Formatted Chapter Markers
Here are a few examples of properly formatted chapter markers:
Example 1:

Example 2:

Example 3:

Properly formatted chapter markers are essential for smooth navigation. When you save the VTT file with these chapter cues, the video player will recognize them, and viewers can easily skip to different chapters or sections.
In the next section, we will walk you through the process of adding chapter markers step-by-step, using your chosen text editor. By the end of this guide, you’ll be proficient in creating well-structured VTT files with chapter markers, elevating your video content and providing an enhanced viewing experience for your audience.
Adding Chapter Markers Step-by-Step
Opening the VTT File in the Text Editor
To begin adding chapter markers to your VTT file, open the file in your chosen text editor, such as Notepad++, Sublime Text, or Visual Studio Code. Simply locate the VTT file on your computer, right-click on it, and select “Open with” to choose your preferred text editor. The VTT file will now be displayed in the editor, ready for you to start adding chapter markers.
Navigating to the Desired Chapter Points
Once your VTT file is open, navigate to the sections in the video where you want to place the chapter markers. This step requires a thorough understanding of your video’s content and the key events or topic changes you identified earlier. Scrub through the video or use the timecodes to pinpoint the exact moments where you wish to insert the chapter markers.
Inserting Chapter Markers Using Correct Syntax
With the desired chapter points in mind, it’s time to insert the chapter markers using the correct syntax. As explained earlier, the VTT file follows a specific format for chapter cues, including the start and end times in HH:MM:SS.MMM format and the chapter title. Type the chapter cue settings, adhering to the syntax guidelines, just above the corresponding section of the video’s transcript.
For example:

Saving the Edited VTT File
After inserting all the chapter markers, ensure that you save the edited VTT file to preserve the changes. Simply go to the “File” menu and select “Save” or use the keyboard shortcut (e.g., Ctrl + S for Windows, Command + S for Mac) to save the file. Saving the VTT file is crucial, as it enables video players to recognize the chapter markers and make them accessible to viewers during playback.
Congratulations! You’ve successfully added chapter markers to your VTT file. The chapter cues you’ve inserted will enable viewers to navigate through your video content effortlessly, providing them with a seamless and enjoyable viewing experience.
In the next section, we will delve into the importance of validating your VTT file to ensure proper syntax and compatibility. Validation is a crucial step that helps you identify any errors or issues that might affect the functionality of your chapter markers.
Validating the VTT File
Importance of Validating VTT Files
Validating your VTT file is a crucial step in ensuring the accuracy and functionality of your chapter markers. Errors in the VTT file can lead to issues during video playback, resulting in improperly positioned or non-functional chapter markers. By validating the VTT file, you can identify and rectify any syntax errors or inconsistencies, guaranteeing a seamless viewing experience for your audience. Moreover, validation ensures cross-platform compatibility, as different video players may interpret VTT files differently. Taking the time to validate your VTT file demonstrates your commitment to delivering high-quality content to your viewers.
Recommended VTT Validation Tools
Fortunately, there are several online tools available that can help you validate your VTT file effortlessly. These tools analyze your VTT file for errors and provide valuable feedback to ensure compliance with the WebVTT standard. Some recommended VTT validation tools include “WebVTT Validator” and “VTT Validator” by the W3C (World Wide Web Consortium). These tools offer user-friendly interfaces and detailed error reports, making it easy for content creators to address any issues that may arise.
Checking for Syntax Errors and Compatibility
When using a VTT validation tool, pay close attention to syntax errors that may be flagged during the process. Syntax errors could include missing timecodes, incorrect cue settings, or improper formatting of chapter titles. Address these errors by reviewing and adjusting the affected chapter markers in your VTT file.
Additionally, consider testing your VTT file with different video players to ensure cross-platform compatibility. Playback behavior may vary between web browsers and media players, so verifying that your chapter markers work as intended across different platforms guarantees a seamless experience for all viewers.
By validating your VTT file and addressing any errors, you can confidently publish your video content, knowing that your chapter markers are accurate, functional, and accessible to all. In the next section, we will guide you through testing your chapter markers in various video players, ensuring they perform flawlessly and provide the best possible navigation experience.
Testing Chapter Markers in Video Players
How to Test VTT Files with Chapter Markers in VLC Player
One of the most reliable ways to test your VTT files with chapter markers is by using the VLC media player. VLC is a popular open-source multimedia player that supports WebVTT files and accurately interprets chapter markers. To begin testing, simply open VLC and load your video file along with the corresponding VTT file in the same directory. When you play the video, VLC will automatically detect the chapter markers and display them as clickable navigation points in the player’s interface. Clicking on any chapter marker will instantly take you to the associated section of the video, allowing you to verify the accuracy and smoothness of the navigation.
Testing Chapter Markers on Online Video Platforms (e.g., YouTube, Vimeo)
Aside from local testing with VLC, it’s essential to ensure that your chapter markers work seamlessly on popular online video platforms like YouTube and Vimeo. Upload your video to the platform of your choice and make sure to include the VTT file as a caption or subtitle track. Once the video is live, watch it on the platform and activate the captions or subtitles. The chapter markers should now be visible in the player’s interface, allowing viewers to skip to specific sections of the video easily. Test the chapter markers on different devices and web browsers to ensure a consistent and user-friendly experience across various platforms.
Ensuring Proper Positioning and Functionality of Chapter Markers
During the testing phase, pay close attention to the positioning and functionality of the chapter markers. Ensure that each marker aligns accurately with the intended sections of the video. Check for any discrepancies or delays in the marker activation. If you encounter any issues, go back to your VTT file and review the timecodes and cue settings to rectify the problem. Additionally, verify that the chapter titles display correctly and convey the content of each section effectively.
Thoroughly testing your chapter markers in different video players is crucial to providing an optimal viewing experience for your audience. Well-implemented chapter markers enhance video navigation and engagement, enabling viewers to find relevant content quickly and easily. In the final section of our guide, we’ll explore common troubleshooting tips and best practices to fine-tune your chapter markers further.
Troubleshooting Common Issues
-
Common Problems Encountered
While adding chapter markers to your VTT file can greatly enhance video navigation, you might encounter a few common issues during the process. One frequent problem is misaligned timecodes, where the chapter markers do not correspond accurately with the intended sections of the video. Additionally, formatting errors, such as missing cue settings or improperly placed chapter titles, can lead to malfunctioning chapter markers. It’s also possible to encounter issues when your VTT file is not recognized by certain video players, preventing the chapter markers from appearing altogether. However, fear not! With the right troubleshooting techniques, these problems can be swiftly resolved, ensuring a seamless experience for your viewers.
-
Troubleshooting Tips for Formatting or Playback Issues
To resolve formatting issues, carefully review the syntax of your chapter markers in the VTT file. Check for any missing or incorrect settings, ensuring that each chapter cue follows the correct structure. Pay close attention to the timecodes, making sure they accurately align with the intended sections of the video. If you encounter playback issues, try testing your VTT file in different video players, such as VLC, YouTube, and Vimeo. Verify that the chapter markers work as expected across various platforms. If inconsistencies arise, double-check your VTT file’s compatibility with each player and make necessary adjustments.
-
Ensuring Cross-Platform Compatibility
Cross-platform compatibility is crucial to ensure that your chapter markers function seamlessly across different devices and browsers. While most modern video players support VTT files and chapter markers, there might be minor discrepancies in their interpretation. To ensure compatibility, follow best practices when creating your VTT file, adhering to the WebVTT standard. Stick to widely supported features and avoid using proprietary extensions that may cause compatibility issues. Regularly test your chapter markers on various platforms to verify their consistency and accessibility.
By proactively addressing common issues and troubleshooting formatting or playback discrepancies, you can deliver an exceptional viewing experience for your audience. Well-implemented chapter markers will not only facilitate video navigation but also enhance engagement and overall satisfaction. In the final section of our guide, we’ll discuss essential best practices for creating chapter markers that optimize the user experience.
Best Practices for Chapter Markers
Choosing Clear and Concise Chapter Titles
When it comes to chapter titles, clarity and conciseness are paramount. Aim to create titles that succinctly summarize the content of each section. Avoid lengthy or ambiguous titles that may confuse viewers. Instead, opt for descriptive phrases that give a clear indication of what the chapter entails. Well-crafted chapter titles not only aid navigation but also entice viewers to explore different sections of your video. By using straightforward and engaging titles, you can enhance the overall user experience and keep your audience hooked throughout the video.
Optimizing Time Intervals for Chapter Markers
Striking the right balance with time intervals is essential for an efficient and user-friendly video navigation experience. Chapter markers that are too frequent might overwhelm viewers, while those spaced too far apart can make it challenging to find specific content quickly. Consider the flow of your video and the significance of each section when setting time intervals for the chapter markers. Ideally, aim for intervals that are long enough to encompass substantial content but short enough to provide meaningful division. Optimize the time intervals to ensure smooth navigation while maintaining viewer engagement.
Maintaining Consistency and Clarity in Chapter Markers
Consistency in chapter markers is crucial for a cohesive viewing experience. Use a consistent format for the chapter titles, ensuring they are easily distinguishable from the rest of the text. Similarly, maintain a standardized timecode format throughout the VTT file to avoid confusion. In cases where your video is part of a series or playlist, consider using consistent chapter marker styles across all videos to create a seamless user experience. Additionally, refrain from overloading your video with chapter markers; instead, focus on highlighting the most essential sections to keep the navigation intuitive and clutter-free.
By implementing these best practices, you can elevate your chapter markers and optimize video navigation for your audience. Clear and concise titles, optimized time intervals, and consistent formatting will make your content more accessible and enjoyable.
Chapter markers are the key to enhancing video navigation and viewer experience. By following the steps and best practices in this guide, you can create seamless and engaging video content. Embrace the art of chapter markers and unlock the full potential of your videos.