Media
How to Insert Closed Captions into a VTT File: A Step-by-Step Guide
27 Jul 2023
10 minute read
In today’s digital era, video content reigns supreme. Yet, without closed captions, a significant portion of the global population is excluded from fully enjoying these multimedia experiences. Herein lies the importance of WebVTT (VTT) files. They are the unsung heroes that provide a critical link for those who are deaf, hard of hearing, or simply prefer to have text accompanying their video content. This article serves as a comprehensive guide on how to insert closed captions into a VTT file. We’ll explore the key differences between closed captions and subtitles, understand the benefits of the VTT format, and delve into the intricacies of preparing your captions, using the right text editor, and ultimately creating and synchronizing captions with your video. Additionally, we also take a look at how to validate, test, and upload your VTT file, explore advanced caption features, and share best practices to ensure your content is accessible and inclusive. So, whether you’re a content creator, an editor, or simply curious about the digital world, read on to unlock the power of VTT files and closed captions.
Table of Contents
- Understanding VTT Files and Closed Captions
- Preparing Your Closed Caption Text
- Choosing the Right Text Editor for VTT Files
- Creating the VTT File and Inserting Captions
- Synchronizing Captions with the Video
- Validating and Testing the VTT File
- Uploading the VTT File to Your Video
- Advanced Closed Caption Features
- Best Practices for Closed Captions and VTT Files
Understanding VTT files and Closed Captions
What is a VTT File?
Web Video Text Tracks (WebVTT or VTT) is a popular file format used for displaying captions and subtitles on HTML5 videos. These plain text files contain both the timing and content of what needs to be displayed alongside your video. This technology offers an easy and effective way to improve the accessibility of your multimedia content.
Closed Captions vs. Subtitles: Key Differences
Though commonly confused, closed captions and subtitles serve distinct purposes. Subtitles are designed for viewers who can hear but may not understand the language spoken in the video. They generally only provide a translation of the dialogue. On other hand, closed captions cater to the deaf or hard of hearing viewers. They not only transcribe dialogues but also include relevant non-speech elements such as sound effects and musical cues.
Advantages of Using VTT Format for Closed Captions
The VTT format has several advantages. Firstly, it is a standard format supported by all modern browsers, ensuring compatibility across different platforms. Additionally, it supports caption styling and positioning, allowing you to enhance the viewer’s experience by adjusting the captions to avoid covering on-screen content. Lastly, VTT files are straightforward to create and edit, making them a practical choice for most video content creators.
Preparing Your Closed Caption Text
Before we jump into the technicalities of VTT files, we need to prepare our closed caption text. This process involves three key steps:
Transcribing the Video Content
The first step to prepare your closed caption text is to transcribe the video content. This means converting all the spoken words into written text. Be sure to include essential non-speech sounds that contribute to understanding the video’s context, such as [applause] or [laughter]. You can easily request a professional transcript on our platform, to ensure you get the most accurate file possible. However, if you want to customize the captions yourself, you can also use our automatic service and obtain your transcription within minutes.
Formatting the Caption Text
After transcribing, we need to format the caption text. Break down your content into concise, easy-to-read chunks, typically two lines or less. Remember, the goal of closed captions is to make content accessible, so avoid complex sentences that might be hard to follow.
Timecodes and Synchronization
Now, for each caption, we need to decide when it should appear and disappear on the screen. These timings are called ‘timecodes’. Timecodes synchronize the captions with the corresponding spoken words in the video. Precision here is critical to ensure a seamless viewing experience.
Remember, preparing your closed caption text is a crucial step in the process. It serves as the foundation for the VTT file we’re about to create.
If you want to learn more about Video Transcription
Read the Guide!Choosing the Right Text Editor for VTT Files
The selection of the right text editor is paramount when working with VTT files. There are several options available, and the choice depends on your specific needs and comfort level.
Built-in Editors in Video Platforms
Most video platforms, such as YouTube and Vimeo, come with built-in closed caption editors. They allow you to directly transcribe and timecode your captions within the platform. This could be a convenient option if you’re looking for a streamlined process and are comfortable working within the video platform itself.
Third-Party Text Editors with VTT Support
If you prefer a more hands-on approach, you can use a third-party text editor that supports VTT files, as these editors offer more flexibility and control over the formatting and timing of your captions. Examples include Amberscript, one of the best solutions for creating polished VTT files quickly and easily.
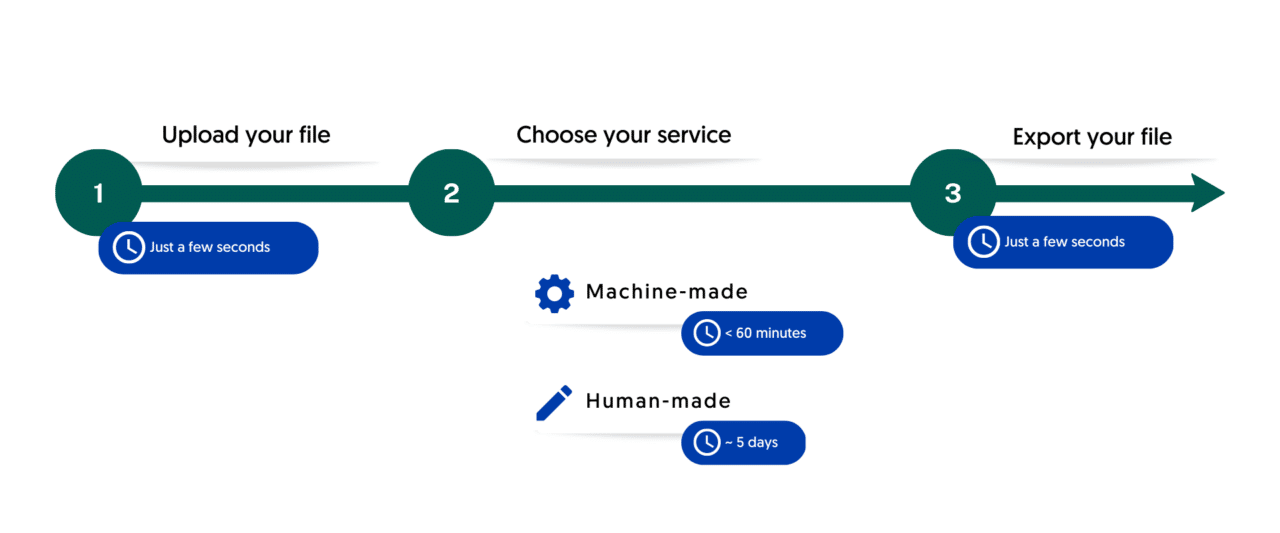
How it works
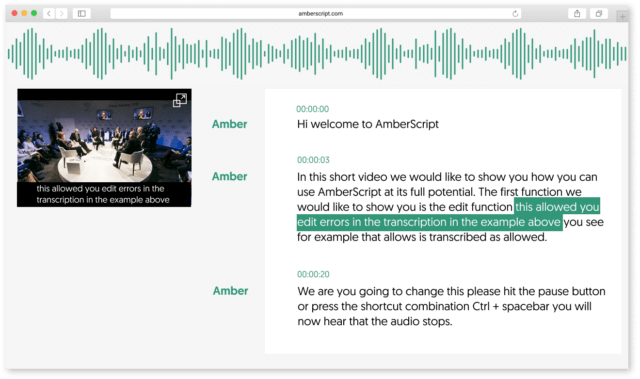
Easy to use online subtitle editor
Our online editor effortlessly syncs your audio with the text, enabling easy adjustments to your subtitles.
You can import video files in many different formats and export your video with subtitles, or export the subtitles separately in Text, SRT, VTT or EBU-STL and many other formats, with optional timestamps and speaker distinction.
Try it free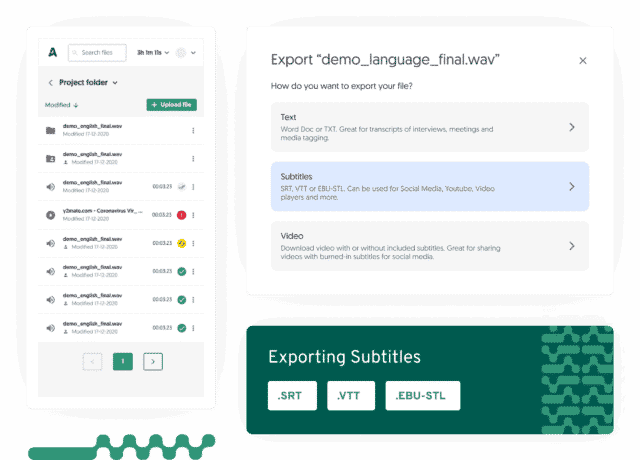
Auto captioning
We provide auto captions with the highest possible accuracies for your video stream
Easy to set up and use with Teams, Zoom, Google Meet, Skype, GoToMeeting, Cisco Webex, Jitsi and Slack. Also available through our streaming API for enterprise integration of lectures, e-courses, webinars and other video streams.
Request a quoteFeatures to Look for in a VTT Text Editor
Regardless of which editor you choose, there are a few key features you should look for. Firstly, it should support the VTT format, allowing you to save your file with the .vtt extension. Secondly, it should allow you to define timecodes for each caption. And lastly, it should provide options for styling and formatting captions.
Remember that the purpose of using a text editor is to make your task of inserting closed captions into a VTT file as straightforward as possible. So, choose one that best suits your comfort level and requirements.
Creating the VTT File and Inserting Captions
Now that we’ve prepared our caption text and chosen our text editor, it’s time to create the VTT file and insert our captions.
Step 1: Creating the VTT File
To create a VTT file, we’ll start by creating a new text file in our chosen editor. Remember to save it with the .vtt extension. The first line of our VTT file should be `WEBVTT` — this tells the video player that the file is in the VTT format.
Step 2: Inserting Captions
Next, we’ll start adding our captions. Each caption is composed of three parts:
- A sequence number: This begins from 1 and increases with each new caption.
- The timecode: It specifies when the caption should appear and disappear on the screen. It should be formatted as `hours:minutes:seconds.milliseconds –> hours:minutes:seconds.milliseconds`. For instance, `00:00:20.000 –> 00:00:24.000`.
- The caption text: This is the transcribed and formatted text we prepared earlier.
Each part should be on a separate line, and there should be a blank line between each caption. Here’s an example:
“`
1
00:00:20.000 –> 00:00:24.000
This is our first caption.
“`
Repeat this process for each caption. Make sure to save your work frequently!
Synchronizing Captions with the Video
Once we have prepared our VTT file with all the properly formatted captions and timecodes, the next step is to synchronize these captions with the video. Synchronization is crucial as it ensures that each caption appears at the right time, corresponding to the spoken words in the video.
To synchronize the captions, we first play the video and observe if each caption shows up at the stipulated time as per the timecodes we defined. If you find any caption appearing too early or too late, adjust its timecode in the VTT file. This process might require a few iterations to get everything perfectly aligned.
For videos hosted on platforms like YouTube or Vimeo, you can upload the VTT file directly to the video. These platforms have built-in tools that allow you to adjust the timing of each caption, making synchronization easier.
If you’re using a local video player, make sure it supports closed captions and that you can select your VTT file as the source for the captions. You might need a special plugin or software to view the captions and make adjustments.
Remember, synchronization might seem like a tedious process, but it’s essential for providing a seamless and inclusive viewing experience. In the next section, we’ll discuss how to validate and test your VTT file.
Validating and Testing the VTT File
After creating your VTT file, inserting captions, and synchronizing them with the video, the next step is to validate and test the VTT file. This is an important step to ensure that your captions are appearing correctly and at the right times.
There are various online tools available that can validate your VTT files, such as the WebVTT Validator. These tools will check your file for any formatting errors or issues that might prevent your captions from displaying correctly.
To use a validation tool, simply upload your VTT file and let the tool do its work. If there are any issues, it will provide a report detailing what needs to be fixed.
After validating your file, it’s time to test it. Play the video with the captions enabled, and watch it in its entirety to ensure that all captions are appearing correctly and in sync with the audio. If multiple people will be using the captions, it might be a good idea to have someone else watch the video as well. They might spot issues that you missed.
Remember to pay attention to the timing, placement, and legibility of the captions. Make any necessary adjustments to the VTT file, and repeat the validation and testing process until you’re satisfied with the results.
By validating and testing your VTT file, you can ensure that your video is accessible to all viewers. In the final section, we’ll explore how to make further enhancements to your captions.
Uploading the VTT File to Your Video
After creating, synchronizing, validating, and testing your VTT file, the final step is to upload it to your video. The process will vary depending on the platform where your video is hosted.
For platforms like YouTube, you’ll need to navigate to the “Subtitles” section of the video settings. Here, you’ll have the option to upload a subtitle file. Choose your VTT file, and ensure that it’s assigned to the correct language.
On Vimeo, you’ll find the option to add captions and subtitles in the “Distribution” settings of your video. Similar to YouTube, you can upload your VTT file and assign it to the appropriate language.
If you’re hosting the video on your own website, the process could be slightly more technical, involving HTML5 video elements and the track tag.
Remember to check the visibility and synchronization of the captions once the VTT file is uploaded. This step is crucial to ensure that all viewers can benefit from the closed captions you’ve painstakingly prepared.
Uploading your VTT file to your video marks the final step in making your content accessible to all. With accurate, well-timed captions, you can ensure that your message is conveyed effectively to all viewers, irrespective of their hearing ability.
Advanced Closed Caption Features
Once you’ve mastered the basics of creating, synchronizing, and uploading your VTT file, you might want to consider some advanced features to enhance the viewing experience even further.
- Positioning: By default, captions are displayed at the bottom center of the video. However, VTT allows you to specify the position of captions. This can be useful when the caption obscures important visual content.
- Styling: VTT files support a subset of CSS, allowing you to change the font, size, color, and background of your captions. Make sure the styles you choose improve readability without distracting from the video content.
- Voice Tags: If your video features multiple speakers, it can be helpful to use voice tags. These are denoted by the `<v>` tag in your VTT file. This tag precedes the dialogue and helps differentiate between speakers.
- Captions for Sound Effects: Captions can be much more than transcriptions of dialogue. Including descriptors of important sounds and sound effects can greatly improve the experience for deaf or hard-of-hearing viewers.
- Timestamps: If your video contains a lot of information or points that viewers might need to reference, adding timestamps to your closed captions can be a helpful tool.
Remember, these features exist to make your content more accessible and engaging. As you continue to refine your closed captioning skills, keep exploring how these advanced features can be used to enhance your viewers’ experience.
Best Practices for Closed Captions and VTT Files
When creating and implementing closed captions in VTT files, there are several best practices that can enhance their functionality and the viewing experience.
- Accuracy: Ensure that your captions accurately reflect the spoken words and significant sounds in your video. Incorrect or misleading captions can confuse viewers and detract from the overall experience.
- Synchronization: Timing is key in closed captioning. Your captions should coincide precisely with the audio for optimum understanding.
- Readability: Use a simple, clear font for your captions and ensure they’re of a size that can be easily read. Avoid fancy or intricate fonts which may be hard to decipher.
- Punctuation and Grammar: Correct punctuation and grammar are essential for understanding. They provide important cues about the flow and structure of the speech.
- Segmentation: Keep each caption’s duration reasonable. A good rule of thumb is to limit each caption to two lines of text and to ensure it’s displayed long enough to be read completely.
- Non-Speech Information: Include relevant non-speech information, such as sound effects and music, in your captions. This provides context and enhances understanding for those who cannot hear the audio.
- Speaker Identification: If your video features multiple speakers, make sure to identify each one in the captions when they speak. This can be done by including the speaker’s name or by using different positions or colors for each speaker’s captions.
- Consistency: Be consistent in your captioning style, terminology, and formatting. Consistency helps viewers follow along and understand the content more easily.
By following these best practices, you’ll not only ensure compliance with accessibility standards but also enrich the viewing experience for all your audience. Remember, the goal of closed captions is more than just transcription—it’s about making content accessible and comprehensible for everyone.
Get a customized offer
Request a quote for your subtitling needs
Mastering the art of closed captioning is a pivotal step towards creating content that is truly inclusive and accessible. By integrating closed captions in VTT files, content creators open their work up to a wider audience, ensuring their message is heard, understood, and appreciated by all. It’s more than just transcribing words – it’s about conveying the essence of your content in a way that resonates with every viewer. Remember, every small step towards accessibility counts, fostering a more inclusive digital world. So, take that step today, and make your content accessible to everyone!